
How to stake DOT on Polkadot Network
This is a guide for users to learn step-by-step how to stake their $DOTs using different wallets. Before explaining how to stake, let’s first look at what is Polkadot and how to buy $DOT.

1. What is Polkadot?
Polkadot is a multi-chain network that allows users create their own blockchains. It consist of main network and parachains or parallel chains which are created by users. It is one of the most popular cryptocurrency known for its speed and scalability. Polkadot is founded by Gavin Wood, Peter Czaban and Robert Habermeier in 2016.
2. How to buy Polkadot?
$DOT is listed on number of well-known exchanges. You can buy $DOT on Coinbase, Binance, Kraken, FTX, Kucoin, Huobi, Gate.io etc.
A- HOW TO STAKE $DOT?
Staking is a system where users put and lock their coins in the network for earning rewards. While users lock their tokens for rewards, they provide security and they contribute to the sytem by participating in the mechanism called as “proof-of-stake” with their locked coins. To sum up simply, staking is a system where users get rewarded for locking their coins on the network.
Let’s look at how to stake $DOT using different wallets:
1. Staking $DOT with polkadot.js wallet
Polka.js wallet is one of the most widely used Polkadot wallet. It is a web browser based wallet where users can create accounts, send or receive $DOT, and stake $DOT.
Step — 1: Creating two different accounts
First, go to https://polkadot.js.org/apps/#/explorer
Before creating accounts, you need to make sure you are on the Polkadot chain. To verify that, you can simply click on the Polkadot icon placed on the left upper side:
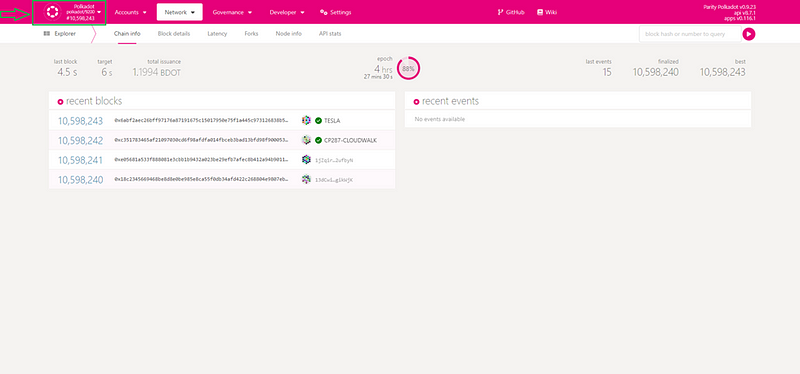
When you click the Polkadot icon, a tab will be open on the left side. You should select Polkadot if any other network is selected:
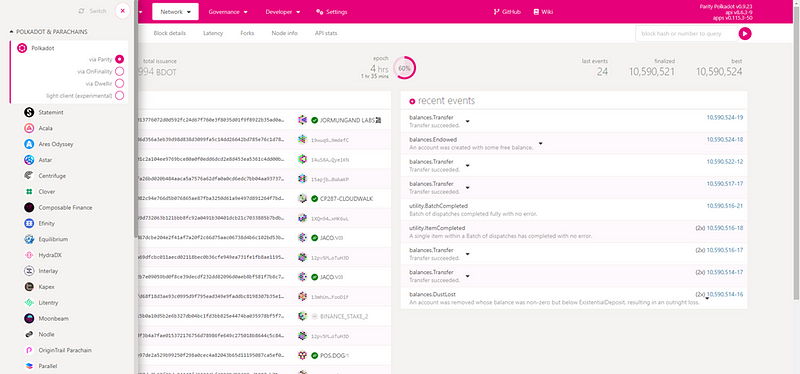
After selecting Polkadot network, go to accounts tab:
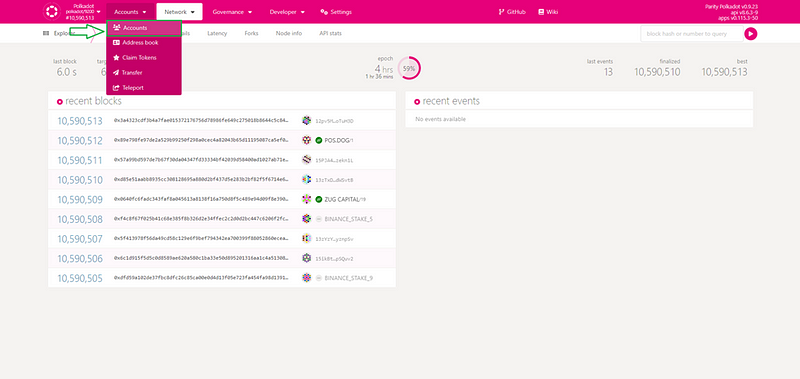
Click on the “Add account” button:
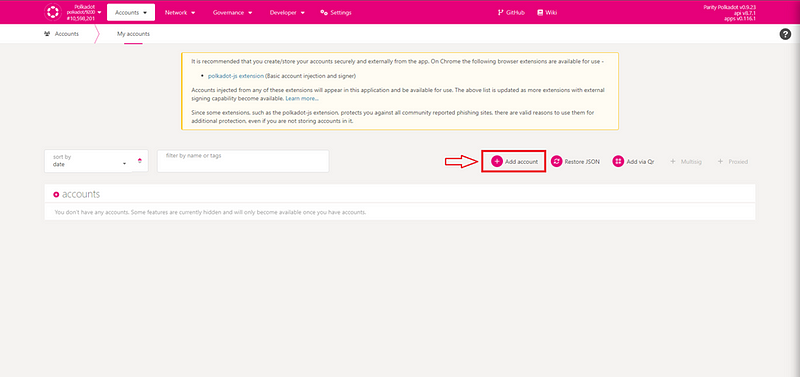
After clicking “Add account” button, you need to save the mnemonic first. The mnemonic is secret seed value for your account. You need to have the mnemonic when you need to recover your wallet so make sure you store it safely.
After saving the mnemonic, you need to check the box below and click “Next” button:
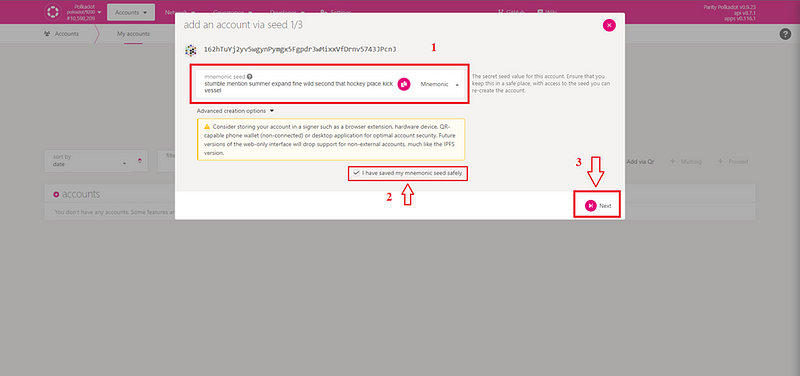
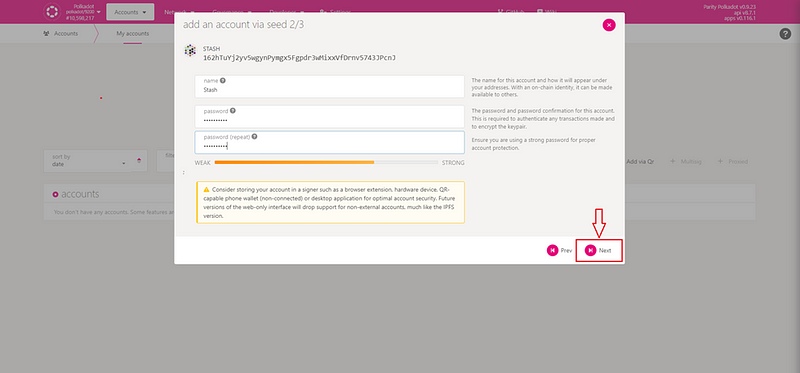
On the next page, name your account and set up a strong password. Then click “Next” button:
Then click “Save” button on the next page to save the backup file of your account:
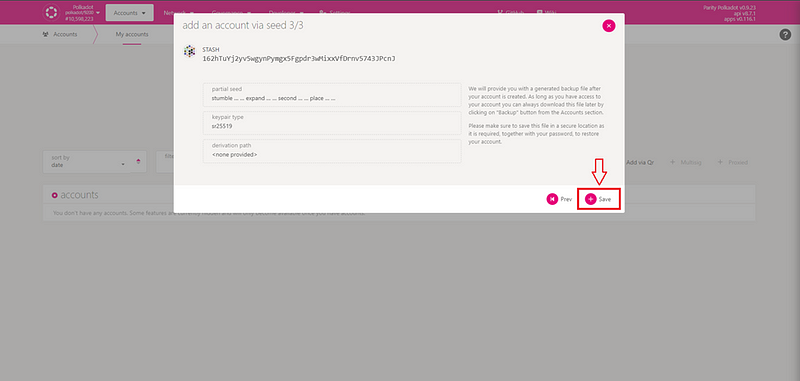
Now you have successfully created your stash account. Repeat these steps to create your control account as well. After having successfully creating two seperate accounts, you are ready to stake.
Step — 2: Staking
First, click “Network” tab and then click “Staking” to go to the staking page:
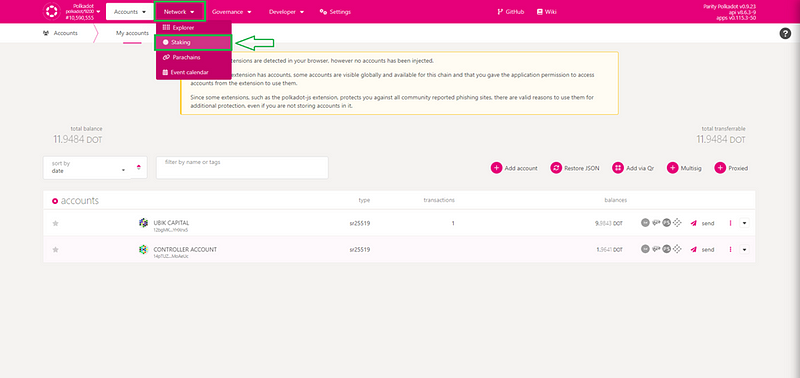
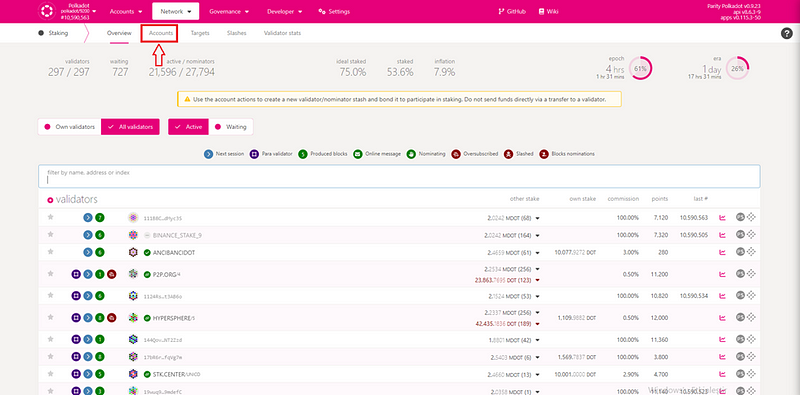
On the staking page, click on the “accounts” button:
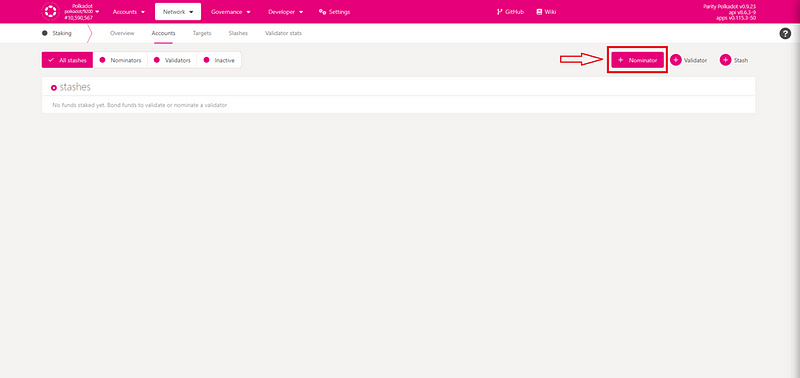
Then click “Nominator” button:
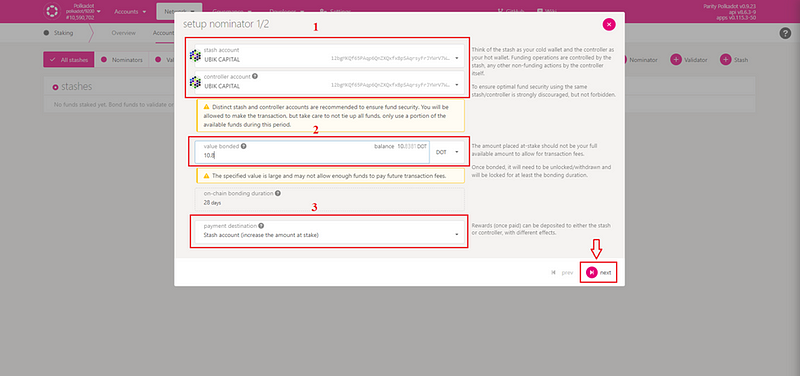
On this step, there are two account selection section on the upper side. You should select your stash account (where you store all of your $DOTs) as the first one and select your controller account (where there is small amount of $DOT) as the second one.
After selecting your accounts, you should choose how much $DOT you will stake. PLEASE NOTE THAT SMALLES AMOUNT IS 120 $DOT FOR EARNING REWARDS. You can stake your $DOTs if you have more than 10 $DOTs but you may not get any reward if you stake less than 120 $DOT.
As the last step of this page, you need to select options for the rewards. If you want to add the rewarded $DOTs to the staking amount, you should choose the first option. (You can choose other options if you do not want to stake your rewarded $DOTs, only the first option is shown in this guide.)
When you complete the three steps in this page, click “next” button:
On the next page, you need to select a validator to nominate your $DOTs. Simply search Ubik Capital by typing “ubik capital” on the search bar to select Ubik Capital as your validator:
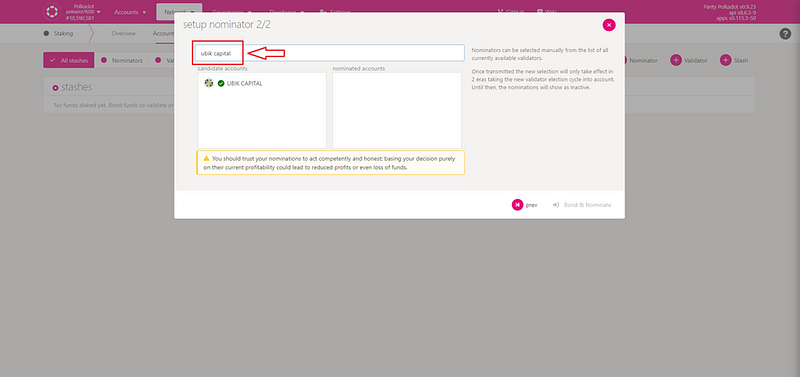
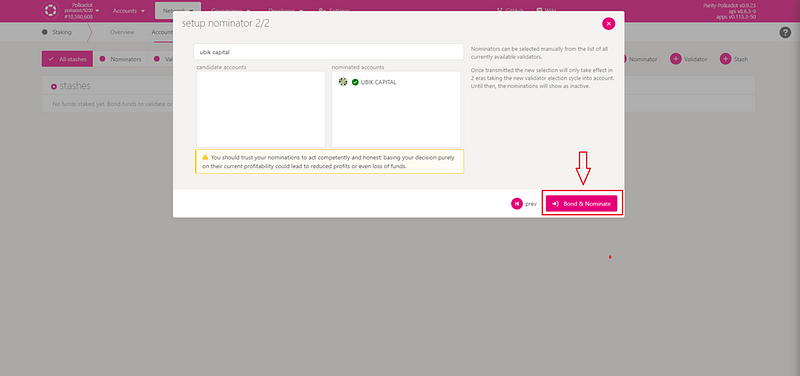
Click on the “UBIK CAPITAL” to choose Ubik Capital as your validator. When you click on it, it will be moved to the right box. Then click “Bond & Nominate” button:
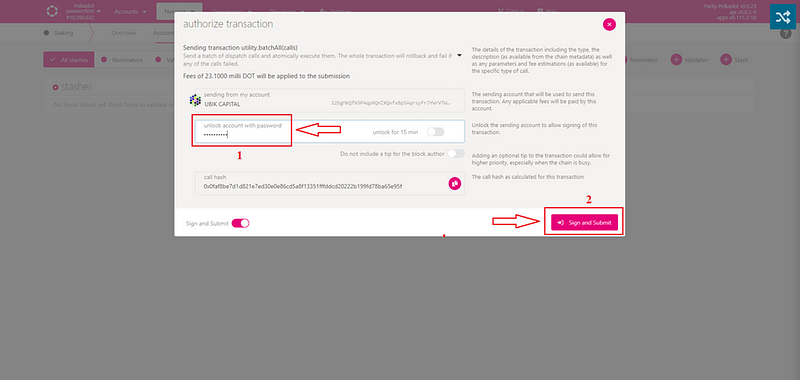
When you click on the “Bond & Nominate” button, the password page will be open to confirm. Enter your passoword and click on “Sign and Submit” buttton:
Congratulations! You have successfully completed staking your $DOTs!
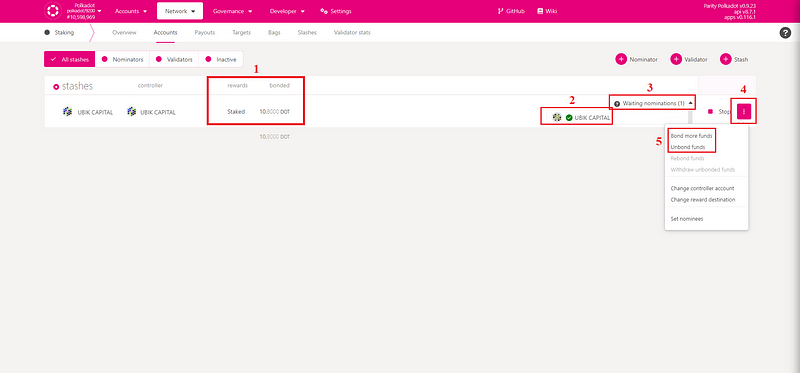
You can see the information about your status after completing all the steps. You can see your staked $DOT amount and your rewards, your validator staus.
Please note that your nomination will be complete when the next era (24 hours) starts. Till then, the information will be seen as “Waiting nominations.
You can add more $DOTs for staking later on if you want to. You can do it simply by clicking on the three dots on the right side and then click on “Bond more funds”. You can also unbound your $DOTs if you want to. You just need to click on “Unbound funds” to unstake your desired amount of $DOTs.
2. Staking $DOT using mobile wallets
There are number of well-known mobile wallets for managing $DOT assets. In this artice; staking with Fearless wallet, Polkawallet and Nova wallet will be covered.
a. Staking $DOT with Fearless wallet
On the main page of Fearless wallet, go to staking section:
On the staking section, you will see the general information about Polkadot staking status. Touch on “Start staking” button:
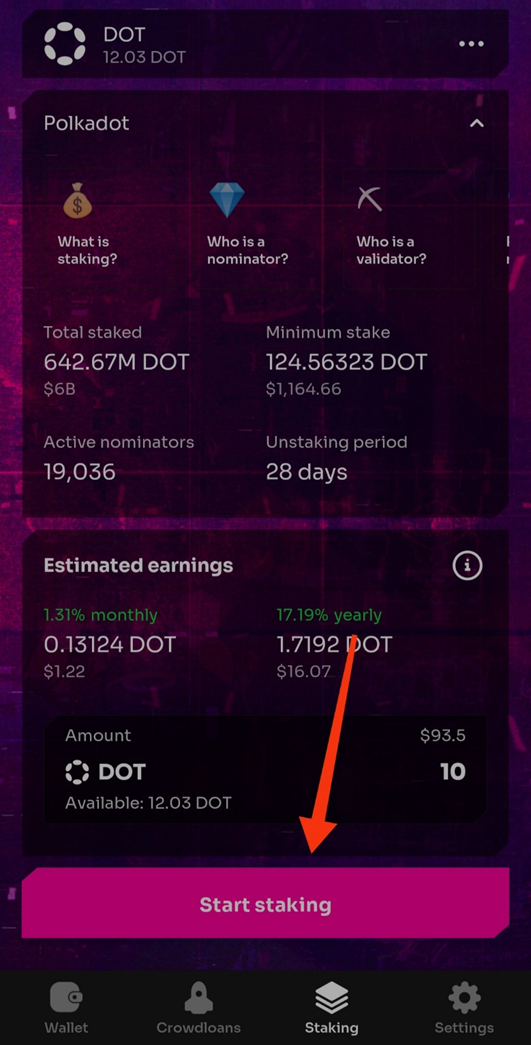
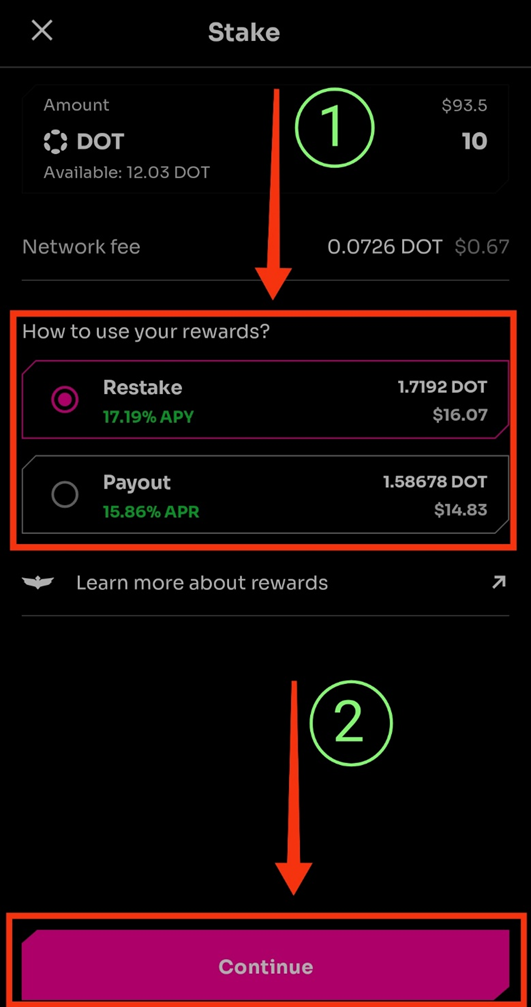
On the staking page, there are two options. Either you add your rewards to staking amount or you recive your staking rewards to different account. Choose which one suits you and touch on “Continue” button:
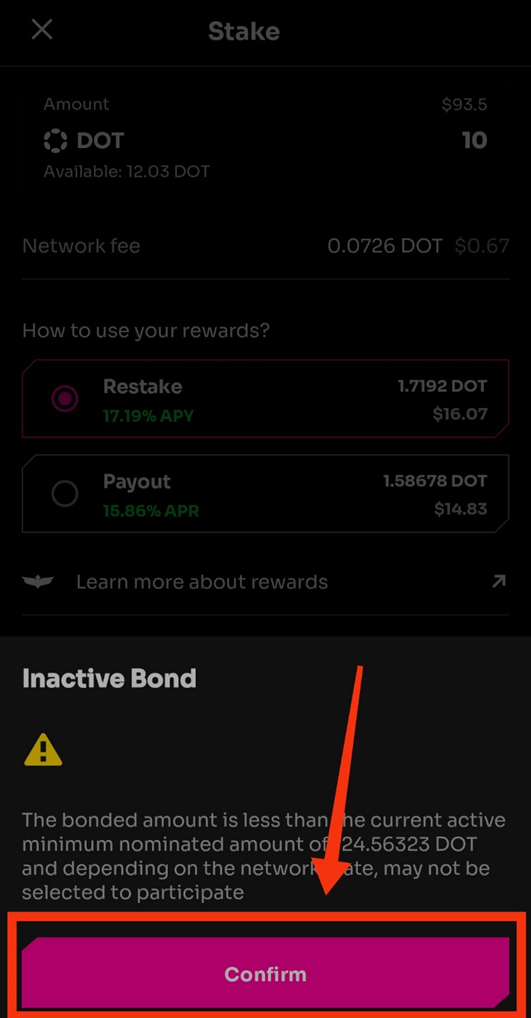
If you stake less than 120 $DOT, there will be a notification. Touch on “Confirm” button to proceed to the next step:
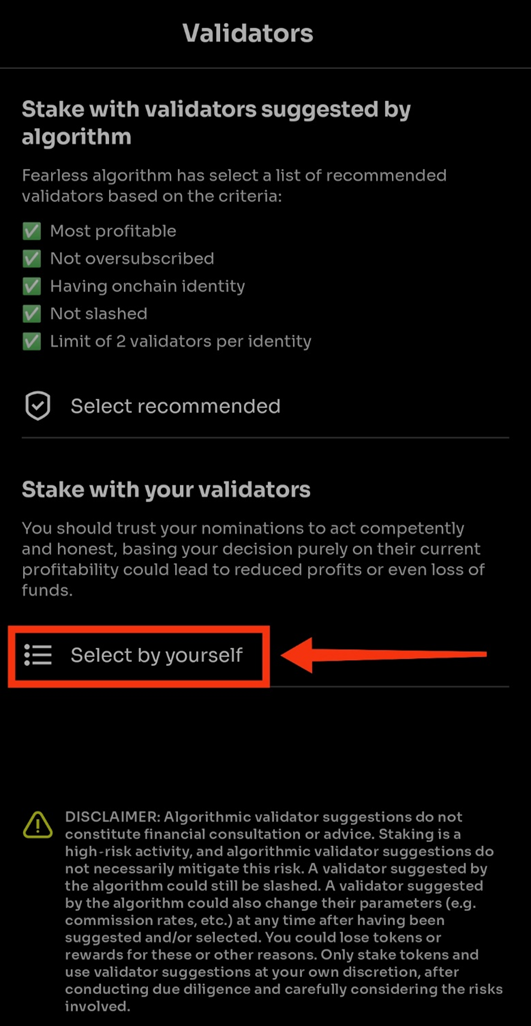
On the next screen, you will select your validator to nominate your $DOTs. Touch on “Select by yourself” button:
You will see list of validators. Touch on search bar icon:
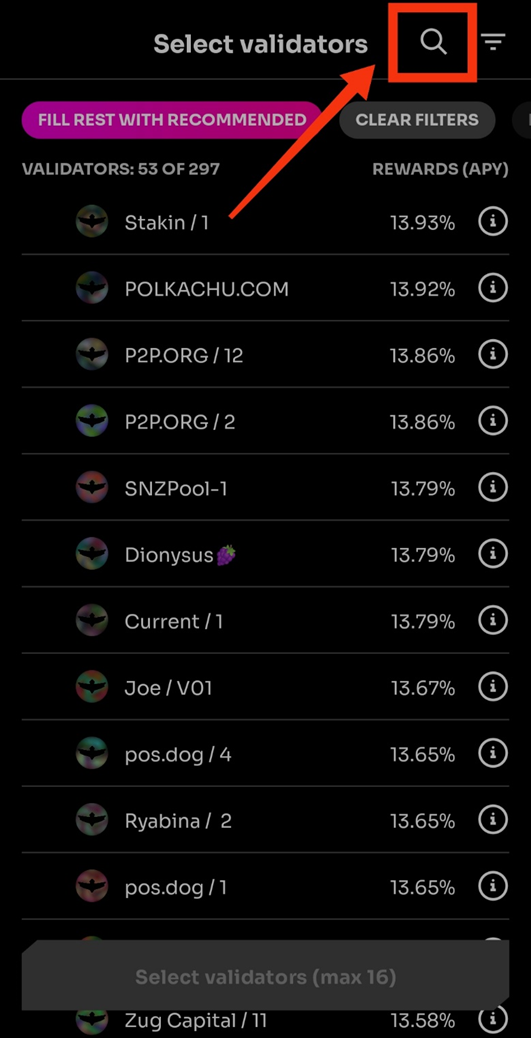
Type “ubik capital” on the search bar (1) and “UBIK CAPITAL” will be shown on the search results (2). Touch on it and then touch on “Done” button (3):
Touch on the “Show selected: 1 (max 16)” button:
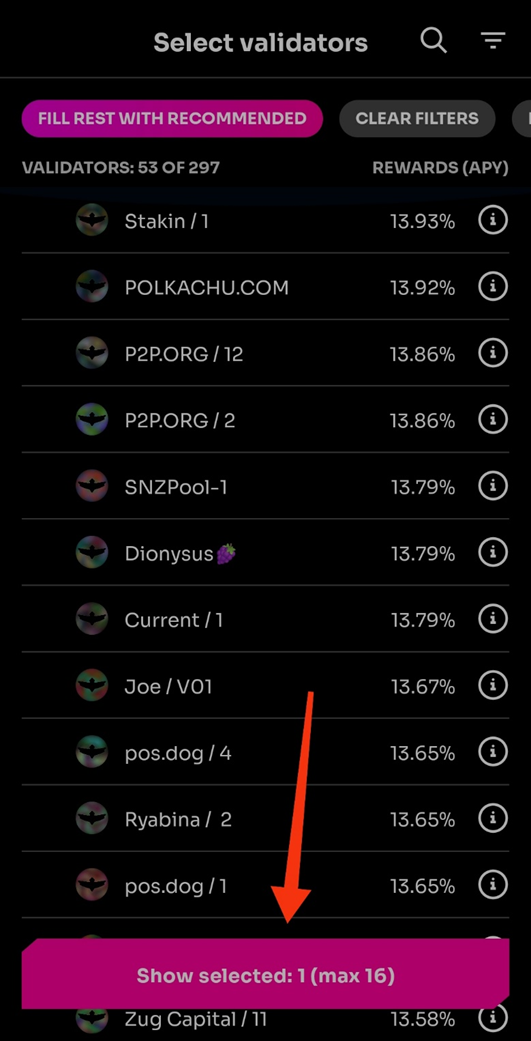
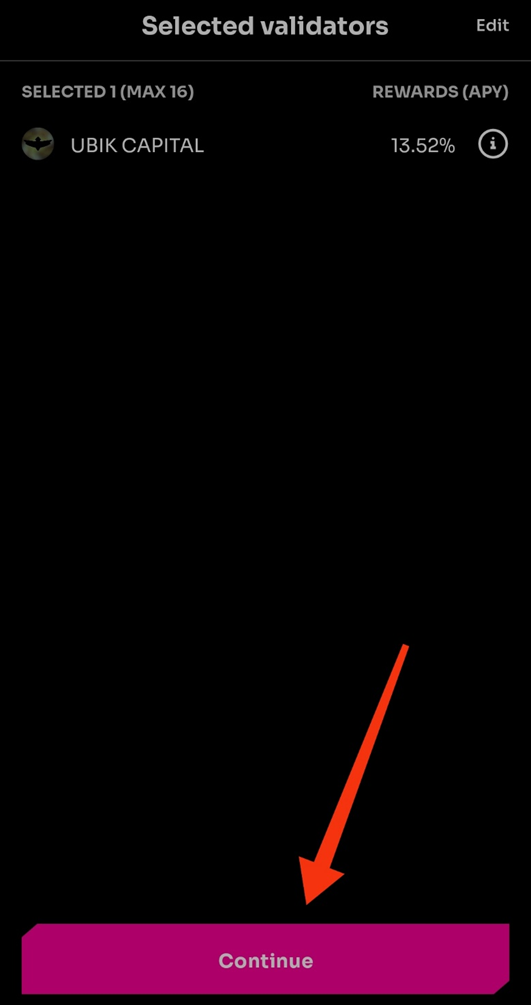
You will see Ubik Capital as your selected validator. Touch on “Continue” button:
On the last screen, you will see the details. Touch on “Confirm” button to complete staking:
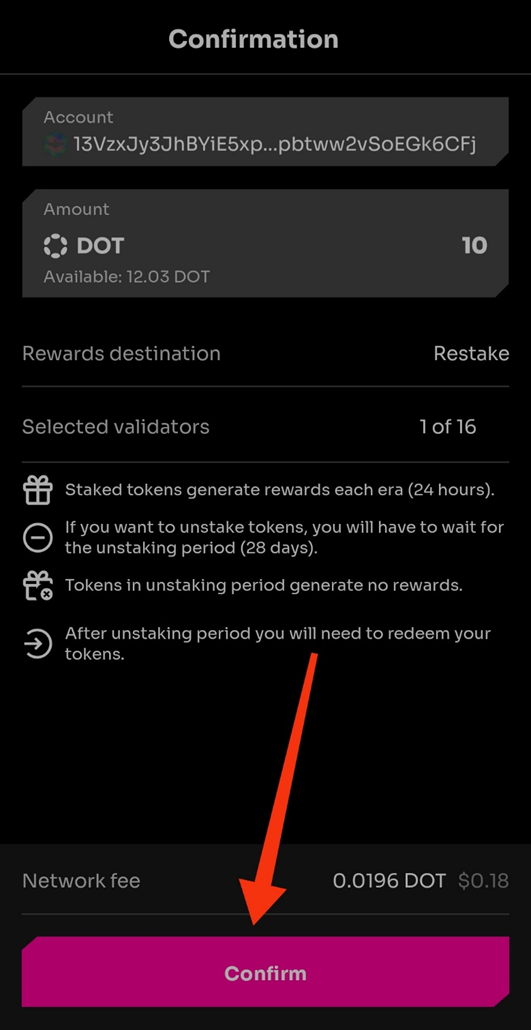
Congratulations! You have successfully completed Fearless wallet $DOT staking.
b. Staking $DOT with Polkawallet
On the main page of your wallet, make sure you selected Polkadot network by touchin on the button placed upper side of the screen:
When you touch on it, options will be shown. Select Polkadot:
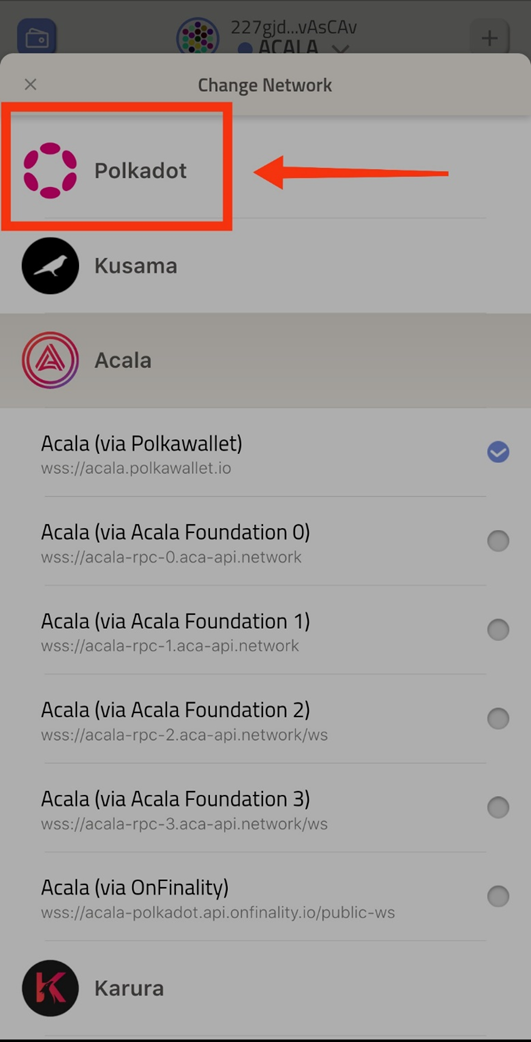
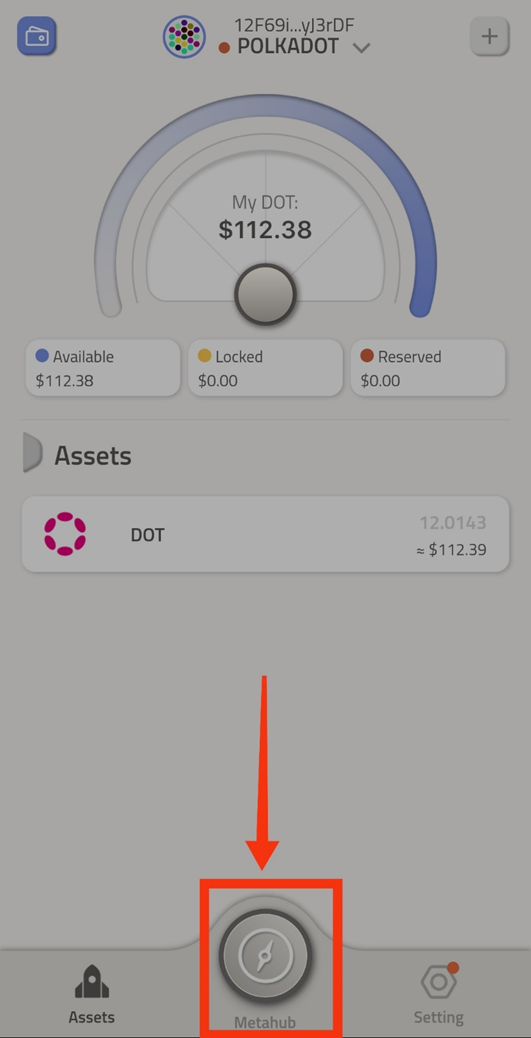
After selecting Polkadot, touch on “Metahub” button:
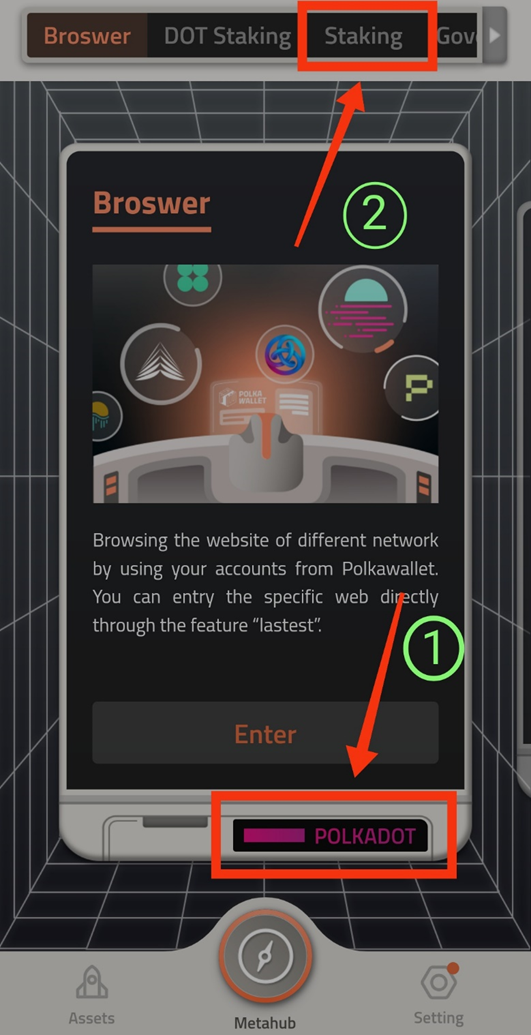
On the Metahub section, you will see that the Polkadot is selected (1). Touch on the “staking” tab (2):
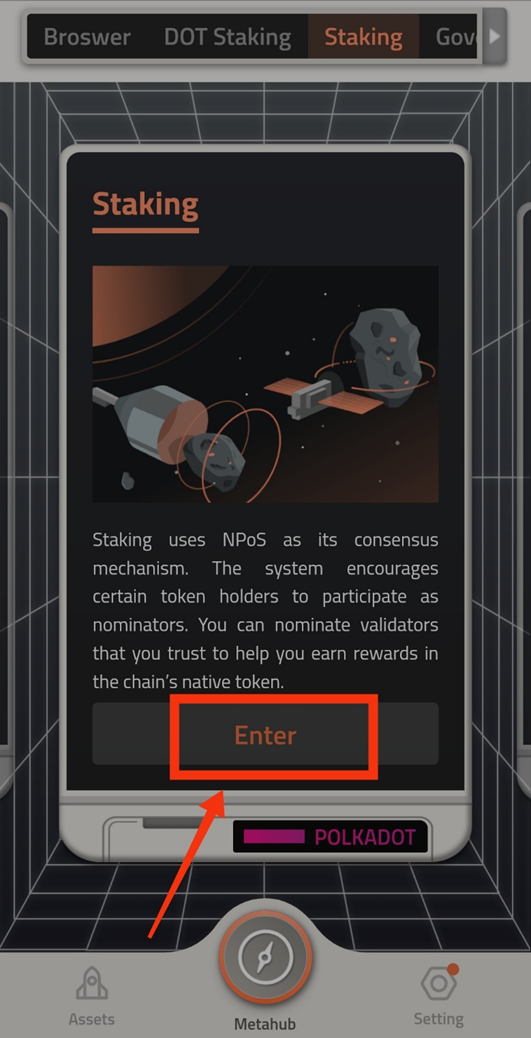
Touch on “Enter” button:
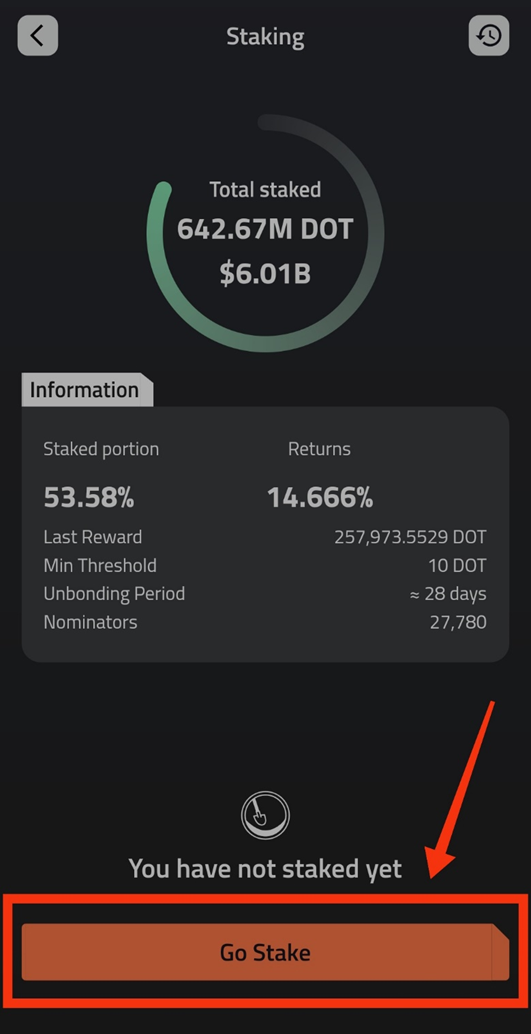
You will see general information about Polkadot staking on the next screen. Touch on “Go Stake” button to proceed:
On this screen, you will see your stash account, amount of $DOT you choose to stake (1) and action regarding rewards (1). You may choose to add your rewards to staking amount or you may choose to send your rewards to different accoun. After choosing the option that suits you well, touch on “Bond Funds” button (3):
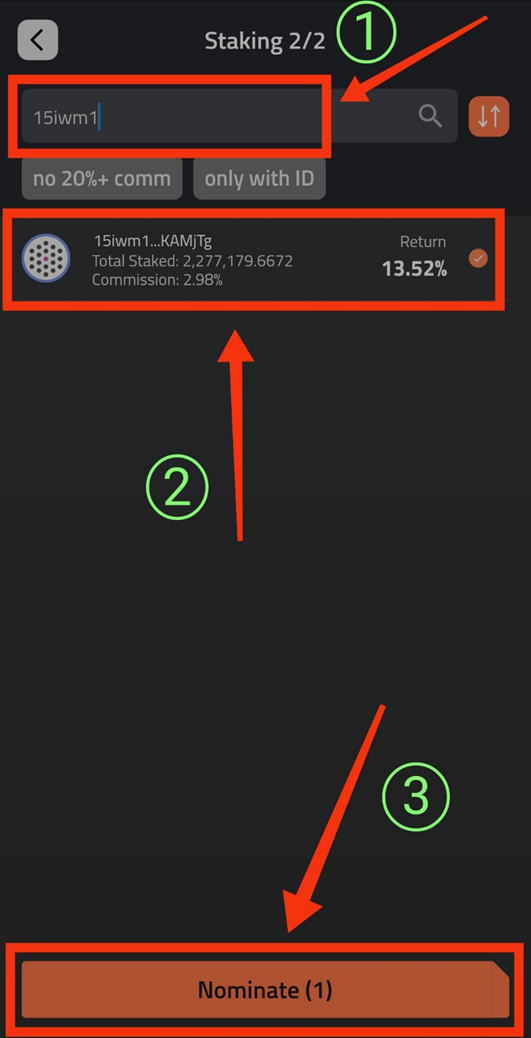
On the next screen, you will select your validator to nominate your $DOTs. Type “15iwm1H” on the search bar. (1) (Ubik Capital doesn’t show up when you type “ubik capital” to the search bar. The validator ID starting with 15iwm1 and ending with KAMjTg belongs to Ubik Capital) Then touch on the validator (2) to select and then touch on the “Nominate” button to proceed (3):
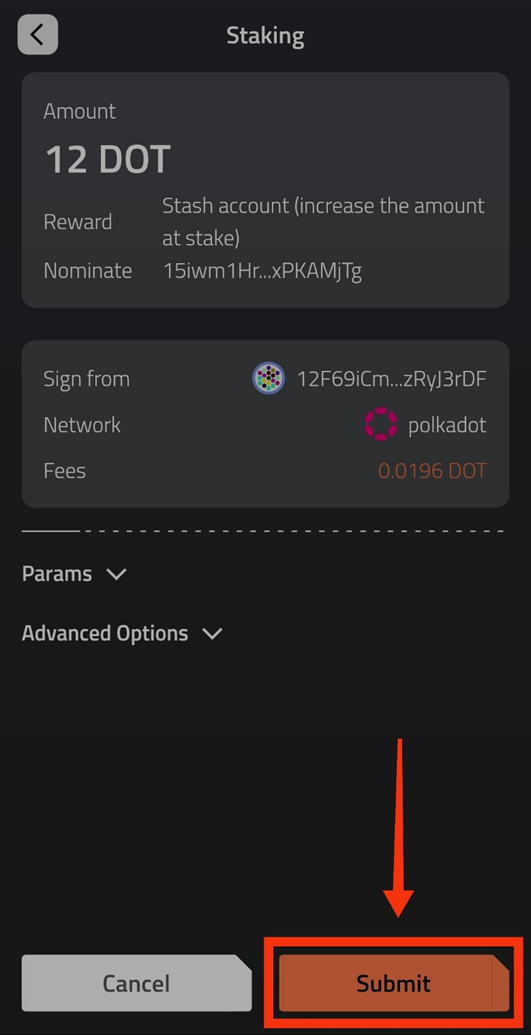
On the last screen, details of your staking will be shown. Make sure everything is done as you wanted it to be done and touch on “Submit” button.
Congratulations! You have successfully completed staking with Polkawallet.
c. Staking with Nova wallet
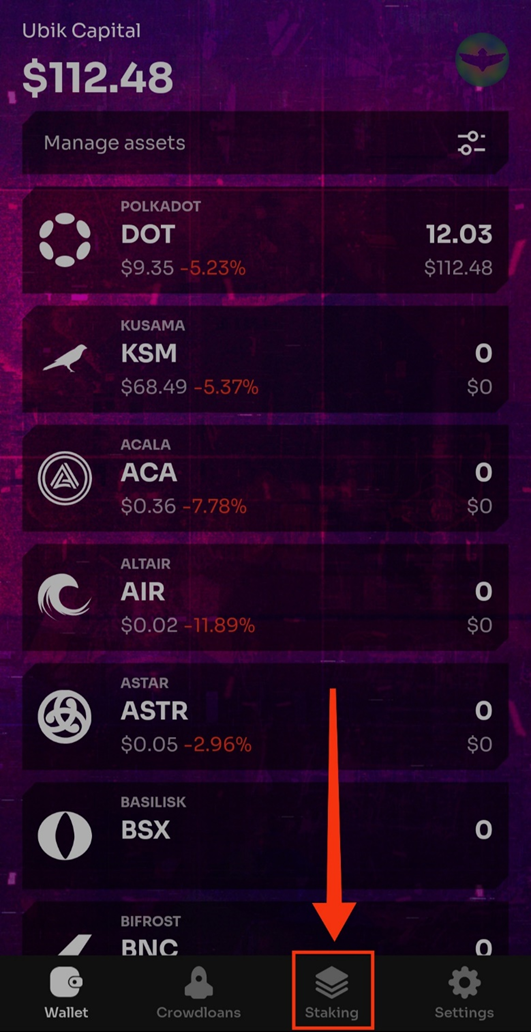
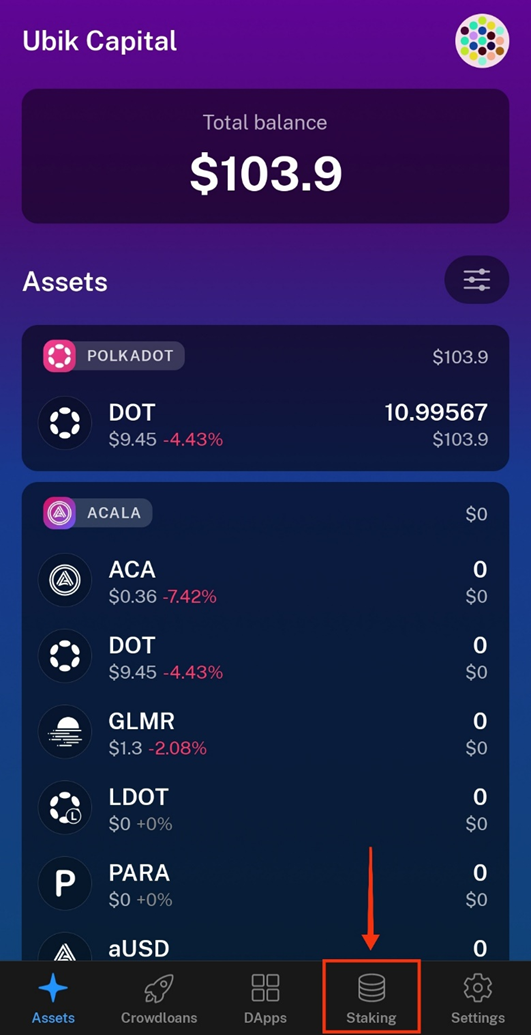
On the main page of your wallet, touch on “Staking” button:
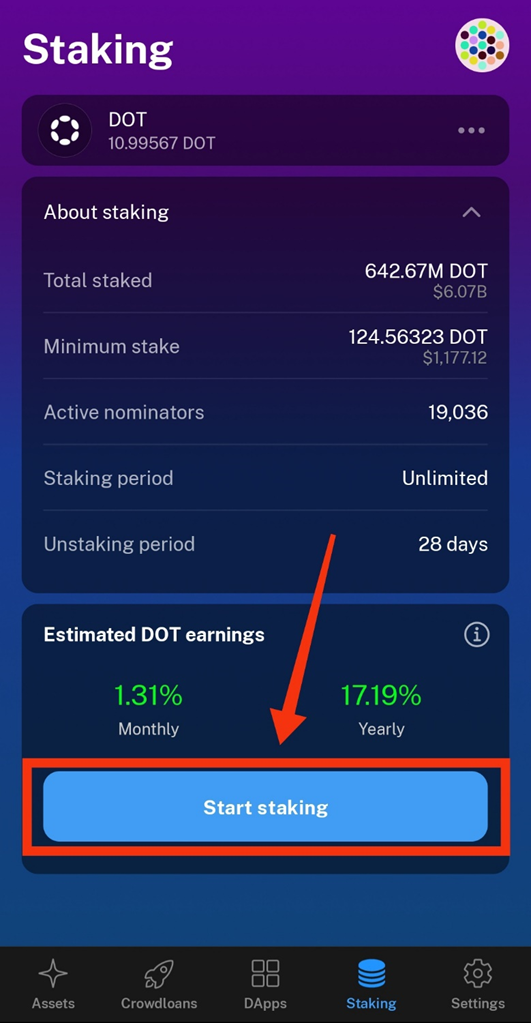
On the next screen, you will see general information about Polkadot staking. Touch on “Start staking” button to proceed:
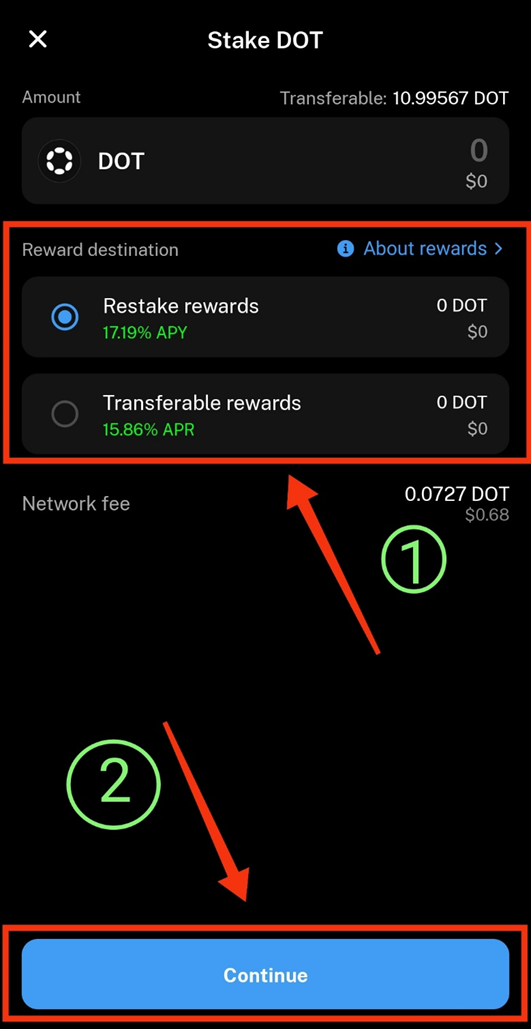
You will see two options. You may choose to add your rewards to staking amount or you may choose to send your rewards to different accoun. After choosing the option that suits you well, touch on “Continue” button (3):
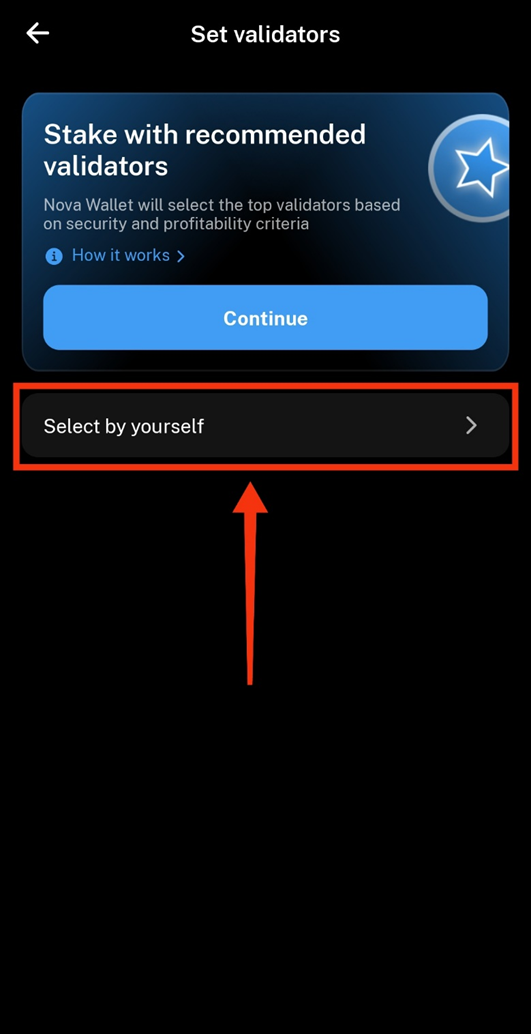
Touch on the “Select by yourself” button to select your validator as Ubik Capital:
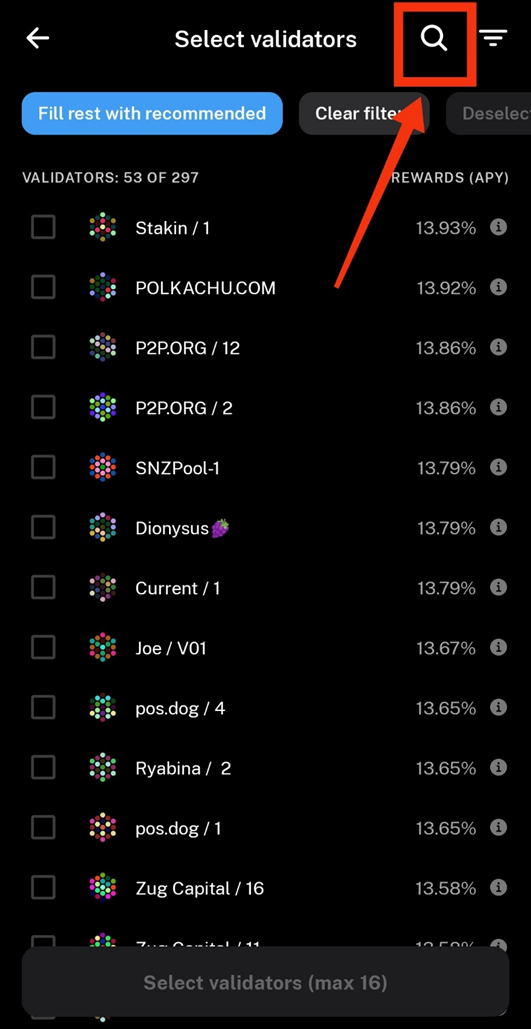
You will see list of validators. Touch on the search icon:
Type “ubik capital” on the search bar (1) then touch on “UBIK CAPITAL” validator on the search results section (2) to choose Ubik Capital as your validator. Then touch on the “Done” button (3):
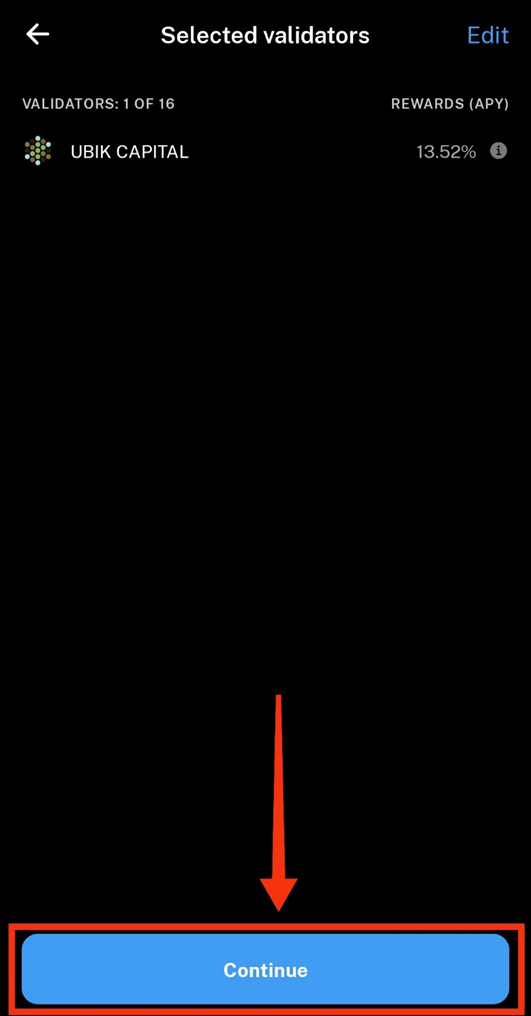
Now, Ubik Capital is selected as your validator. Touch on “Show selected: 1 (max 16)” button:
Touch on “Continue” button:
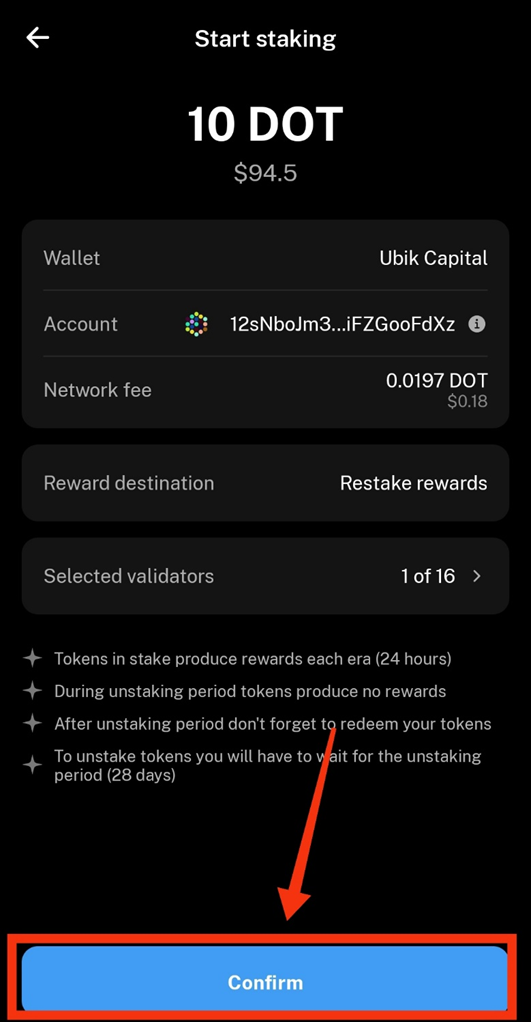
On the last screen, you will see the details of your $DOT stake. Touch on “Confirm” to complete staking:
Congratulations! You have successfully completed staking your $DOTs with Nova wallet.